|
SHOOTING THE BLACK
POWDER REVOLVER Basic black powder revolver gunsmithing This is the 5th of 8 articles Link to article 1 Warning:
inexpert gunsmithing
may result in a revolver that has a dangerous "hair trigger" or fails
to "lock up" when cocked. If you follow the steps below, be
absolutely sure you check the trigger pull and that the cylinder is
fully locked in place when the hammer is cocked. Thoroughly
check
all revolver functions before you load it and attempt to shoot it.
This article includes the
following sections:
Internal
components
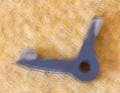
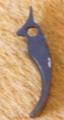
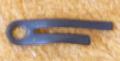
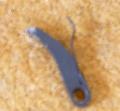
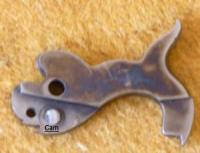
The internal
parts of any single action Black
Powder revolver consist of just a few pieces: the hammer ,
the cam
( a small beveled piece of steel pressed into the bottom of the
hammer),
the hand & spring, the mainspring, the trigger, the cylinder
stop &
spring (AKA the cylinder bolt) and the trigger & cylinder stop
spring.
In my experience, the items that wear out or fail most often are in the following order: the hand & spring, the mainspring and the cylinder stop & spring. In addition, the lock end of the trigger will become rounded and will require dressing or replacement. I have never replaced a cam although people tell me that they do wear out. Preliminary to any attempt at
repair
Before you do anything, completely
disassemble and
clean the internal mechanism of your pistol. Make absolutely
sure
that all foreign objects, particles and fouling are completely removed.
Carefully inspect all parts for broken or loose pieces.Basic troubleshooting and repair
Let’s start this article with
a discussion of problems
caused by a defective "hand & spring." If your
cylinder
doesn’t
rotate every time you cock the hammer you may have an
extremely dirty
internal mechanism or a broken "hand & spring" (probably both
because
heavy accumulation of fouling in the mechanism is the leading cause of
a
broken "hand & spring"). Hand & Spring Problems If your cylinder does not rotate all the way to the next chamber and does not lock-in when you cock the hammer, the tip of the hand is worn out. If your revolver jams up when you go from full cock to half cock (without letting the hammer all the way down) then try to go back to full cock, that's another sign the tip of the "hand" is worn out. There may be times when
the hammer will sometimes
not pull back all the way, but will jam up half way to the next
chamber. This caused by a broken or loose spring in the "hand
& spring." If
the spring part of the "hand & spring" is not broken, but has
come
out, you can solder it back in. To solder the spring back
into
its slot in the hand part, start by cleaning any bluing or rust off all
mating surfaces and make sure they are
completely "tinned", especially the inside channel of the
hand the spring fits into. Use plenty of
flux
and enough heat from a large enough iron to cause the solder to flow
easily -- I don't recommended you use a gas torch for this
because
you will overheat the
spring and ruin it. After all mating surfaces are
tinned
properly, reheat the hand until the solder melts and then
slide in the spring while applying enough heat to cause the solder to
completely liquefy and for the parts to join. Make sure the
spring stays in place as the solder
cools. New "hand
& springs" are available from Dixie
Gun Works, but they are oversize and will require hand
fitting. I
suggest
you buy two or more (they’re cheap). Use your old hand as a
guide and file off the
excess metal very
slowly and carefully. Avoid
making the tip of the "hand" too sharp
as you file away at it or it will wear out too quickly in service.
Above all, keep putting the piece back in the revolver
and trying it as you remove metal. While working on the new
hand piece, if the "hand" is
too long, your cylinder will lock up long before the hammer can be
fully cocked, so try to make it just long enough so that the cylinder
locks in just a tiny hair
before the hammer is fully cocked, but still allows the hammer to be
cocked. When you think you have the new "hand" made properly, assemble the entire revolver, then bring the hammer up to full cock then let it down to half-cock and then try to cock it from half-cock. If it jams, you took a little too much metal off the tip and you must start over with a new piece or you might try a little trick that worked for me. Recently I noticed that my Baby Dragoon wasn't cocking properly because the hand was wearing out. Rather than send for a new hand piece, I decided to do a little experiment. I took the piece out, laid it on a small anvil and carefully hammered it so as to elongate the metal both from the sides of the tip and from the top of the tip while keeping the overall shape of the piece. It worked great, but the spring came loose, but it soldered in nicely as described above. By the way, hammering
on the tip like that "work
hardens" the soft steel and makes it less subject to wear so I expect
this repair will last a while. If you are a good
"micro-blacksmith" and can shape small metal parts with a hammer, you
might try what I did because you have nothing to loose and you might be
able to
save yourself some time in fabricating a new part. On the
other hand, I can't guarantee that this will always work. After you are satisfied that your hand & spring part is shaped properly, completely assemble the revolver and test it out as described at the beginning of this chapter. Mainspring Problems
If you have a broken
mainspring, you
might be glad
you have a Colt (as you know, Remington mainsprings are a
pain).
Again, I suggest you buy two or more springs and use the first one as a
learning tool. Springs made of modern metal may be bent to
shape
(slightly) while cold - just don’t overdo it. A new
spring will be
too long and will not be quite the right shape for your revolver -
count
on it. You must use thought and care when forming and
grinding them
to fit. Good Luck! Cylinder Stop & Spring
problems
The "cylinder
stop & spring" has a solid
end (called the bolt). The bolt end engages the holes in the
cylinder and stops it from rotating when at full cock. The
other
end of this piece is cut down the middle and forms a spring.
The spring end works with the cam in the hammer to allow the cylinder
to
unlock while cocking, then it skip off the cam and allows the bolt to
fall into the cylinder hole at full
cock. After long usage, the cam wears out the half of the spring end it engages. When this happens, the spring falls off the cam at or before reaching half-cock for loading. The spring end can also not engage the cam at all and the cylinder locks locks up the hammer so it won't pull back at all. Many times a problem such as this is caused by cap fragments getting into the action and may be fixed by disassembling the lock and removing the fragment. Other times these problems are cause by a spring end that is too weak and may be fixed by carefully bending the spring outward to make that end wider and engage the cam better. If you are careful and bend it only a little, the spring may be bent while cold without breaking. If the problem is caused by a broken spring end, the whole piece will have to be replaced. Fitting a new "cylinder stop & spring" is usually pretty easy if you use the old part as a guide. Try not to take off too much metal too quickly and keep trying it for fit and function. With the pistol mostly disassembled, take a strong light and look down into the mechanism while moving the hammer and make sure the spring end of the "cylinder stop & spring" is working with the cam so that it catches, the bolt gets pulled down and releases at the right times. As I mentioned before, the spring end may be bent slightly while cold without breaking it if you are careful. Trigger and Cylinder Stop Spring
Problems
There may be times when the cylinder
will not lock in at all, but will
continue to rotate even at full cock. It is rare but, some
times
the "trigger
& cylinder stop spring" breaks and this keeps the small bolt on
the
"cylinder stop & spring" from being pushed up and locking the
cylinder. This flat double
spring is really
easy to replace and requires little or no hand fitting. Trigger and Hammer Sear Problems
There may be
times when your revolver will
have too much of a "hair trigger" or will not stay cocked at
all.
This is an extremely dangerous condition and is almost always caused by
excessive wear at the lock end of the trigger piece. 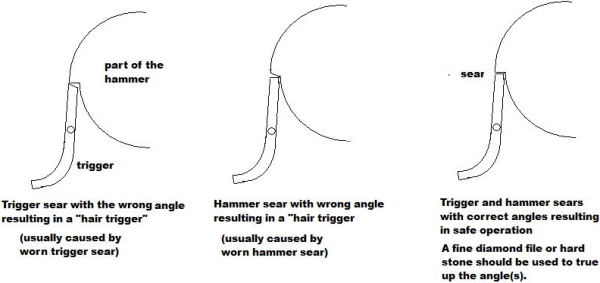 If you have a Colt and you like to target shoot with it, you might want to replace the trigger since taking metal off the lock end will move the position of the hammer at full cock (and thus move the rear sight alignment). If you have a Remington or don’t care, you can take an oilstone and carefully "true up" the trigger end until it is flat across the top. A trigger trued up this way will last a long time, however, if you want to do it right (especially if you have a Colt), you should case harden the tip. It’s easy to do it yourself with a Mapp gas torch and some hardener from Dixie Gun Works. It is my opinion that all trigger tips should be case hardened, even new ones, because, even though they are "color case hardened" they are too soft. Caps Failing to Explode When
Struck by the Hammer
People sometimes have problems with caps failing
to go off
especially after having fired several rounds. Many people
blame
the brand of cap they are using, but I really don't think cap brand is
related to this problem because any cap should work in any revolver.
No, a problem like this is caused by something wrong with the
revolver itself.Assuming you have a good, tightly screwed down mainspring and that it engages the hammer's roller squarely and that feels right when you cock the revolver, caps failing to go off is usually caused by an excessive gap between the hammer's head and the top of the cone. This can be caused by a tiny piece of fouling in the frame's channel that keeps the hammer from going all the way down (the most common cause) or in brass framed Colt types, it can be caused by the arbor pulling out of the frame due to excessive loads and rammer pressure when loading. If you suspect that your pistol is pulling apart, put the the pistol together, wedge in tightly, and with your thumb pushing on the back of the hammer, try to push the cylinder back and forth. There should be some motion, but not a whole lot. You could also push the cylinder back and check the gap between the cylinder and the back of the barrel. Of course, there should be a gap, but not much (around .015 if I remember correctly). If you have an arbor that is pulling out of an overstressed frame, I don't think there is much you can do about it. Assuming that everything is good and the arbor isn't pulled out, the first thing I would suggest you do is to look carefully at the bottom of the frame's hammer channel to see if there isn't a piece of cap in there. If the channel is clear, you probably have a problem with the channel being too shallow or perhaps it is too narrow and binding the hammer. These problems are generally seen only in new revolvers that may have a slight manufacturing defect and really shows up only after several shots that puts a thin layer of high friction fouling in the channel. Failure to explode caps can sometimes be cured by buying after-market cones that are generally a little longer than factory ones. If that doesn't work or you don't want to try that, I've got some other suggestions. Check for hammer to cone clearance by trying this, put your hammer all the way down, put pressure on the hammer with your thumb and try moving the cylinder back and forth. You should feel a slight motion of the cylinder as it goes back and forth. Now put on a cap and try the same thing and with heavy thumb pressure on the hammer, you should not feel any movement of the cylinder back and forth. If you get any cylinder motion, you probably have excessive gap between the hammer's head and the top of the cone and you might try deepening the channel a very small amount with a narrow file (or buy long cones), BUT before doing any filing, carefully lower the hammer down from full cock and when it is resting in the frame, push hard with your thumb to see if it will go down further. If it does, it is probably not a channel depth problem, but the problem is caused by the hammer binding in the channel. If you suspect binding, check to see if the hammer is going all the way down smoothly and is only stopped by running out of room in its channel or if it feels "sticky" at the bottom when you go to cock it. Another thing you should check is side to side clearance. When the hammer is all the way down, it should have enough clearance in its channel so that you can feel it move very slightly from side to side as you push it side to side. If you do in fact have a binding problem (not that unusual), I'll repeat myself and say that it is many times made worse by the fouling that occurs due to blow-by through the tiny holes in the cones accumulating on the hammer and in the channel. This minor fouling accumulation doesn't normally cause problems in a good functioning revolver, but it does increase any binding friction that may be there. The solution is to carefully widen the bottom of the channel with a file while keeping the sides straight and square. You will probably want to widen both sides, but be very careful and take off only enough metal to give your hammer the right amount of clearance. Revolver Cone Problems
Before ending, I want to say something
more about
the
cones (nipples) the caps go on. One problem is caused by the
little hole in the cone being too large and letting too much gas
through them on firing. The other problem is with regard to
cones
being too large (or too small) for the caps to go on without
extraordinary force or caps that won't stay on. Finally I
want to
discuss stuck cones and how to remove them. Let's discuss
the
blow-back problem first.Years ago I noticed that the cylinder of a Baby Dragoon pistol I (still) have would sometimes be half way to the next chamber after taking a shot. This only happened after shooting one particular chamber, so I just figured it was because the mainspring was weak. What was obviously happening was that the hammer was being thrown back by gases coming out the nipple and I thought it was because the spring wasn't strong enough to keep the hammer down. Well, it turned out that there was nothing wrong with the mainspring, the problem was that the tiny holes in the nipples were too large, they were letting too much gas out when a chamber discharged and one was worse than the others. You see, the hole next to the cap is supposed to be large, but the inside hole next to the powder is supposed to be tiny so that the very hot gas from the exploding cap is focused into a thin, high pressure jet that penetrates deep into the powder and positively sets it off. On the other hand, the inside hole's tiny size will prevent almost all of the hot combustion gas from getting past it so that there won't be a sufficient volume of gas to push the hammer back. That's the way it's supposed to be, anyway. If your hammer is being pushed back on the discharge of a chamber and is causing your cylinder to unlock and partially rotate, this is not a good thing. This push-back is caused by too much gas escaping past your nipple's inside hole and under these circumstances, you should replace your defective nipples with ones with smaller holes. Sorry, but there is no fix for nipples who's holes are enlarged except to shoot only very light loads. With regard to the issue with cones not going on or staying on, it was recently suggested to me that you might want to consider grinding your pistol's cones until they fit No. 10 caps easily, but snugly. I think this idea has merit especially if No.11 caps fall off and No.10 caps have to be jammed on with extraordinary (dangerous!!) force. I do not suggest you do this unless you are skilled in precision micro-grinding operations and are willing to re-caseharden the nipples after grinding. To my mind, it is so much easier (and cheaper) to buy a good quality set of replacement nipples that are guaranteed to fit a particular cap size. Let's face it, if you try this, you are probably going to have to buy at least one replacement nipple anyway, so why not buy a whole set of super-quality nipples in one throw? Lastly, there is the problem of removing stuck cones that won't come out. Cones get stuck because they rust, old oil and grease gets hard, but mostly because they were torqued in by somebody pretending to be Hercules when they only need to be lightly "snug" tight. When we are confronted with a stuck cone, we are tempted squirt in a little "3 in 1" penetrating oil, wait 10 seconds and then wrench it with all our might. This almost always results in the shoulders of the cone getting rounded and many times the hardened steel of the wrench chips. Of course I am talking about the infamous "brute force method" that us guys always use because, well, because we are guys -- there is even a medical term for this behavior: 'Hypertonic Male Hormone Encephalopathy' (or "testosterone poisoning" or "all balls and no brains" ) and as the name suggests, it afflicts men, but seldom women. Women have their own Hormone Encephalopathys, but we won't go there. A much more effective and sensible approach to removing stuck cones is to put on the stuck cone a drop of a good light machine oil, some WD-40 OR better yet, some of Dr. Mongomery's special formula (that I will describe below) and then let it sit for an hour or more. If you use a penetrating oil, I don't think it makes any difference what oil you use, they all soften rust, but the mixture mentioned below should work the best. The next step is to line up your wrench so that it is straight on. The fact is, many types of pistols machine the cylinders so that the cones screw in at an angle, so be sure the wrench is exactly in line with the cone regardless of the angle. While pushing hard on the wrench, gradually apply counter clockwise torque until you reach some point just before the wrench slips off the cone. Nothing happens, right? No, nothing will at first, so you must keep that torque hard on and steady until you think your hand will drop off. Just when you are absolutely sure your hand really will drop off, the cone will almost always start to turn just a little. When the cone turns a little, drop in some more oil and screw the cone back in, then back it out again, then screw it in and keep doing this until you can screw it all the way out. Now if the cone still hasn't moved and your hand is fatigued, take a long break, let the oil do its thing, rap the end of the wrench with a small hammer to send shocks down to the cone and then try again. If the cone still won't move, let it sit overnight. Remember, the key is a large, but steady torque lasting a long time. If you find that you can't hold the cylinder in your hand long enough without getting fatigued or it is turning in your hand, try this little trick. Take two short 7/16ths (10-11 MM) wooden dowels, put them in opposite chambers and then clamp them securely into a vice. This will hold the cylinder and absolutely prevent it from rotating without marring it. The worst case I ever worked on required me to protect the finish of the cylinder with a strip of thick leather and then clamped it in a vice (using the wooden dowel method would have worked better). Using both hands, I applied steady torque on the wrench for the longest time, but in the end, all the cones came out. I assure you that I have handled some pretty "tough dogs" before, all rusty and frozen on, but there is not a cone that ever came my way that I wasn't able to get off eventually. Just added: Dr. David Montgomery has just informed me that scientific tests have established that there is a mixture of substances that is superior to all the commercial products on the market for freeing stuck parts. I have never tried this mixture before, but in my mind, I can understand why it should be so effective. It is so cheap and easy to make, I think it should be given a try. To make it, take a small amount of automatic transmission fluid (say, 20 drops) and mix in three times that amount of commonly available acetone (say, 60 drops). Put a drop on the part that is frozen and wait a while. This stuff should work really well because it is a combination of a light oil, with an extremely low viscosity, together with a powerful, but relatively non-toxic solvent that can dissolve and penetrate into tight places. I don't recommend using this stuff for cleaning your revolver and be aware that the acetone will damage the finish on plastics and panted surfaces. Tests to know if your revolver is
ready for use
The word "timing" is used a lot
when talking about the action of a revolver. For a revolver
to be
"timed" properly several things must happen as you pull back on the
hammer to cock it. First, the cylinder bolt in the frame,
down
and to the right of the cylinder must start to retract and release the
cylinder so it can rotate. This should occur with the first
motion of the hammer. At about half way, there will be a
click
indicating that the trigger mechanism has passed the half-cock lock on
the hammer and if the hammer is gently released, it should remain at
half-cock. While at half-cock, the cylinder should freely
rotate
and allow reloading. Pulling the hammer back all the way to full-cock and just when you get to full-cock, three things must happen at almost the same time: (1) The cylinder bolt must release (pop up) just at the end of the hammer travel. If it releases prematurely, the bolt will not be lined up with its locking cut-out in cylinder and will put a scrape on the cylinder. If the spring end of the cylinder bolt is worn or doesn't have enough spring tension, the bolt will be released before the hammer is back all the way and the cylinder has not rotated to its proper place. You can try expanding the spring part of the bolt or you may have to buy a new one. If the cylinder bolt doesn't release at full-cock, it is because a replacement bolt wasn't made properly and the spring end will have to be carefully filed down a little more until it releases the bolt just at full-cock. By the way, fragments of caps that get into the mechanism many times break the spring part of the bolt or compress it. If you have a jam caused by fragments in the action and your pistol malfunctions even after removing them, check the spring end of the cylinder bolt. (2) The cylinder must rotate just enough so that the proper locking cut-out is right over the cylinder bolt just as the bolt is released at full-cock. If the hammer is at full-cock position and the bolt has released, but the cylinder isn't quite there yet, you need to make a new hand & spring or the tip of the hand will have to be lengthened as I have already described. If you have made a new hand & spring and you find that the cylinder rotates too much so that when the bolt pops up at full-cock it lands beyond its cut-out in the cylinder, you must carefully shorten the tip of the hand so the cut-out lines up with the bolt just at full-cock. Be sure your spring is tightly secured to the hand part and can not wiggle free. Solder in the spring if necessary or get a new piece. (3) Just as you reach full-cock and the cylinder bolt pops up to lock in the cylinder, the trigger sear must lock into the sear on the hammer and the hammer should be securely and safely locked into the full-cock position. If the trigger sear locks into the hammer much before the other things happen, this means that the sear end of the trigger is too worn and the trigger should be replaced and a new one fitted for proper operation. Of course, a pistol can be operated this way, but extra thought must be given to pulling back the hammer until everything is locked in and this is not a good thing. It is ever so much better if everything locks in at the same time while pulling back on the hammer. Next, while the revolver is at full cock, place your thumb on the hammer and pull the trigger, but don't let the hammer fall. Very slowly bring the hammer down while listening carefully. When you get to almost to the very end of the hammer's travel, just before it reaches the frame, you should hear a soft, but noticeable "click" or "ping." This is the sound of the spring end of the cylinder bolt riding over the hammer's cam and clicking into place on the steep side of the cam. If you don't hear the click, you probably already noticed that your revolver jams sometimes and the cylinder fails to rotate. This can indicate a damaged cylinder bolt, but mostly it is because the spring end of the bolt hasn't been spread enough or was fit poorly when a replacement bolt was made. Finally there is this, if your revolver mysteriously "jams" for no good reason (like the slugs aren't down below the top of the chambers or there are cap fragments inside the action or the oil in there has turned gummy or grimy), that means something needs further attention. While it is jammed, pull back on the hammer and see if the cylinder bolt is retracting. If it isn't, you have a problem with your cylinder bolt spring end that engages the cam of the hammer as described above. If the bolt is retracting properly, you have something wrong with the hand and spring and it is probably caused by the spring not being out far enough or it's loose and not staying in position. It's also possible the tip of the hand is worn out and this causes the cylinder to not line up too (as described above). If the hand is too short or not being held in position by the spring, that puts the hand on the wrong part of the rotating cutouts at the back of the cylinder and that can jam things up. A final word on the care of
Black Powder Revolvers
I
think that it is well to remember that
one of the B.P. revolver’s worst enemies is heavy
accumulations of powder
grime (fouling). You should stop shooting and do an external
cleaning of your revolver if its action starts to
feel sluggish because all that extra force required to cock puts a lot
of stress on the internal mechanism and is probably the number one
reason the hand & spring fails.
Remember, our revolvers are not modern weapons that shoot
clean
burning
propellants and if you don't use grease behind the bullet, they will
not shoot more than 12 to 18 shots between
cleanings. Of course, if you use sufficient grease behind
your
bullet, you will be able to shoot many more rounds - perhaps 50 or more
rounds.
Your revolver’s internal mechanism’s real worse enemy can be you. If the mechanism is jammed or starts to get stiff, don’t force it! Clear the jam or clean out whatever is hanging up the revolver before doing any more shooting. If your revolver starts malfunctioning, end the shooting session early and take the piece home where you can work on it. If you have any unfired chambers, simply take the caps off and it will be safe to transport. Unless I'm mistaken, a B.P. revolver is leagally considered "unloaded" if it has the caps off and without the caps, there's no way to set it off accidently. If you don't load with grease behind the bullet and fouling has made it impossible to disassemble your revolver, put a few drops vegetable oil (jojoba, olive oil, etc.) on and around the cylinder pin and wait a minute or two for it to penetrate (spray on cooking oil works well too). After you have removed the cylinder, try to evaluate what is wrong. It is probably just a dirty and jammed cylinder, the cylinder pin (arbor) is loaded with fouling, or there maybe a fragment of exploded cap in the mechanism. Never, but never use a brass hammer or any kind of extraordinary force to disassemble or clear a jam as I have seen some people do. Believe me, a small bottle of vegetable oil (or a can of spray on cooking oil) and a little patience is far more effective than whacking your revolver with a brass hammer. Well, that’s all I know about this subject. I sincerely hope that these series of articles have been of some use to you and have not insulted your intelligence. Please, when you’re shooting, use your good sense and shoot safely. Just remember, if you don't know what you are doing and go ahead and do it anyway and get yourself killed, don't come around and blame me. Won't do you any good anyway because I don't believe in ghosts. Seriously, be careful and if you are unsure of anything, go to a gunsmith. The next page is a list of items that a beginner should have after they have purchased their revolver. I have also included some tips on how the beginner might get started safely in this sport. If you are an experienced shooter, you probably have all this stuff and don't need the tips, but you might want to look it over anyway. I am always looking for tips and suggestions to encourage beginners, so if you have any that I haven't mentioned or I might have wrong, please write me at my geojohn.org mailbox.End of page 5
If you have entered this page from a search engine, Continue on to Page 6 of my
Revolver
Articles
or Select another revolver article or See my other shooting articles that includes three articles on flintlock shooting If you are planning to leave
without continuing,
|