|
SHOOTING
THE BLACK
POWDER REVOLVER
© John L. Fuhring Managing black powder fouling by proper loading technique. This is the 3rd of 8 articles Link to article 1 Introduction
The single most
important factor in consistent
precision throughout a shooting session is the management of black
powder fouling. Because
of their chemical compositions, black powder and the black powder
substitutes (including Triple Seven) leave a hard residue (called
fouling) in
the bore after each shot and
unless steps are taken, layers of this fouling build up with each shot
until the stuff
literally burys your pistol's rifling. The traditional
practice
of plastering grease over the tops of loaded chambers is supposed to
help slow this buildup, but every shooter knows that this practice
actually has very little effect on fouling buildup. Why fouling must be controlled Why is it important to be concerned about fouling burying your rifling? Buried rifling can not spin your bullets as they travel down the barrel and without spin to stabilize their flight, your bullets will be all over the target or miss it altogether. This is a very bad deal and takes all the fun out of shooting, so we need to either clean after each shot (who wants to do that?!?) or (better yet) find a way to manage fouling so it does not build up and affect our pistol's accuracy. The good news is that
there is a simple way to transform hard fouling into a soft, greasy
substance that does not
build up in the bore and cover the rifling. This method
actually
works and is much less messy than the traditional method of plastering
grease on the outside of loaded chambers. In this article I
present three
simple and convenient loading techniques and by using any one of them,
you can easily achieve what I call "good
fouling management." If you practice good fouling management,
you
can make it so that your
revolver’s precision
is limited only by your ability to hold it on target, not by the
fouling that builds up as you shoot. You will also notice
some
other advantages besides improved precision
if you use my loading suggestions, but I'll mention them later. I have recently added a
new essay on
shooting techniques that I recommend you try at home and at the range.
This page, fouling management, is all about
improving your REVOLVER'S
native precision, which is a vital first step, but the new essay
contains suggestions about improving YOUR
precision and accuracy which is a much more advanced topic.
There is a link at the end of this
article to those shooting techniques, but it might be a good idea to
wait until you have read this and all
the other articles first. I mean, let's take it a step at a
time and learn or review the basics first. This is a long article
with a lot of
points that I think are important for people to think about.
As
long as this article is, I hope you will find it easy to read and
entertaining. You may find that I repeat myself a lot, but
that
is intensional because I firmly believe that repetition (and practice)
is a key to learning. Scroll down and read the headings if
you
wish to know what this article contains. A question of historical accuracy
People have asked me if my techniques
are
historically accurate and the answer is NO (and neither is slopping on
Crisco over the loaded cylinder). I have never read in any
cavalry manual where the soldier was advised to load or care for his
revolver in the ways I suggest. When these weapons were used
in
war, the revolver was loaded with combustible paper cartridges
with NO
grease either on top or on the bottom of the slug. Of course,
the
revolver would jam with fouling and shoot poorly after several rounds,
but the revolver was not the main fighting weapon and it was unusual
for a cavalryman to shoot the revolver more than a six times in an
engagement. The
soldier was issued only 25 rounds of pistol cartridges to his 100
rounds of
carbine ammunition, so the main fighting weapon was the carbine.
For sustained skirmishes, the carbine was the weapon of
choice,
while for close-in mounted combat, where friends and their horses might
be
hit, the saber was the weapon of choice. About the only time
the
revolver was useful was in fending off a charge while the soldier was
still in a mounted line, had not yet taken up a skirmish line and could
fire out from his unit's position without danger of hitting his friends
or their horses. Sometimes a volley of pistol fire was
directed
at an enemies' line while the company was still in line for a charge
and before sabers were drawn ("draw pistols --- fire pistols ---
holster pistols --- draw sabers --- CHARGE!!" oh yeah, I heard that a
lot).Why these loading techniques are not historical Forgive this diversion, but I want to tell a little story to illustrate this point. I know the value of the saber from experience because once we decided to do a reenactment with pistols only. Wouldn't you know it, some of our own guys hit each other with wads of Cream of Wheat (which stung badly through the wool uniforms even at a distance) and the horses just went nuts when stung by the blanks not intended to hit them. The "enemy" got off better because we didn't aim directly at them or their horses. I remember this one instance when I fired to one side of a "Johnny Reb." One of my "comrade in arms", who's horse had been stung and was out of control, came out of nowhere right across my barrel just as the revolver discharged. From all the loud cussing at me as his horse was galloping away from the melee fight, I guess it must have hurt. Later, in camp, he was still grumpy about it, so I had to carefully and gently explain that it was his horse's fault he got shot and that I had done everything right under the rules of engagement we were following not to aim at persons or horses and by no means was I being reckless. Sure, I felt bad and sure, it stung and scared him, but nobody or their horse was killed or bleeding and so we remained friends and besides, he wasn't the only one who got stung. The revolver was a very
useful and highly effective combat weapon, but because its was not
expected to shoot that many rounds at any one time, fouling was not
much of an
issue. During those rare times when the revolver was used
extensively in skirmishes and firefights, the soldier simply removed
the cylinder and then poured
water out of his canteen over and into the barrel then shook it dry.
He didn't care
if the revolver
rusted, he could take care of that later. I think that's why
today, the
period pieces that were used in combat, look so bad, with
rust and deep pits everywhere including inside the bore.
Let's
face
it, during mid 19th Century, weapons were government
issued tools that had to work in combat, but were not something that
the soldier
owned and certainly were not carried for fun. A soldier's
revolver functioned properly or it was exchanged for one that did and
it was not regarded as a prized posssession as it is today.
Firearms wore out in service in a year or two, not like our well tended
revolvers that will stay new looking and new shooting after 50 and more
years. Today things
are very different and people expect to shoot 25, 50 or even 100 rounds
during a single session. People are also very concerned that
their revolvers keep looking new, with no rust or pits anywhere,
especially in the bore. The shooting techniques of the
wartime
past are totally inadequate to the needs of today's shooters.
Modern shooters today know that shooting more than 12 rounds
at
one session without stopping and cleaning and re-oiling their revolvers
would be impossible using the techniques of the past, BUT if you use my
Fouling
Management techniques (outlined below), you will be able to shoot
nonstop during your entire shooting session and your revolver will
maintain its native precision without stopping to clean (or pour water
down the barrel from your canteen). OK, let's now get into
the meat of this article. The key factor in "Fouling
Management"
We can achieve
good fouling management by the
use of the right substances applied in the proper manner. In
the
following paragraphs I will present three ways to load the B.P.
revolver
to minimize fouling and maximize precision. All three methods
reject
the traditional practice of (what I call) ‘Glomming on
Crisco’. By
this, I mean thickly coating the outside of the loaded cylinder with
Crisco
(or ‘Spit Ball’, Bore Butter, etc.) as is
recommended by just too many black powder shooters, videos and "how-to"
books.
What I am about to suggest is very controversial because every "expert" will tell you that you MUST coat the outside of the loaded chambers with grease to prevent chain firing and to "lube the bore". Believe me, Glomming Crisco absolutely will NOT prevent chain firing (see first article on chain firing). As for lubing the bore, after the first shot, all the grease is blown out of the remaining chambers and subsequent shots get little or no "lubrication." Next time you load the conventional way, just look at your cylinder after your first shot --- is there any grease remaining? No, it was all blown away and the subsequent shots will do nothing but build up hard fouling in the barrel. Don't bother with greasing the outside of a loaded cylinder. To keep fouling soft, your revolver’s bore needs a residual of grease after the bullet passes. What the bore really needs is grease behind the bullet. Grease on top or on the sides of the bullet is pushed out as the bullet leaves the muzzle, doesn't mix with the fouling already in the barrel and does nothing to soften the fouling left behind as the bullet passes through the barrel. I have experimented over and over with this and my results can not be argued with. Before I continue, let me submit a proposal for your consideration. I think that we use the term "Bullet Lube" way too loosely. Crisco, lard, Bore Butter, Spit Ball, Etc. should Not be thought of as "Lubricants", but rather as "Fouling Modifiers" or "Fouling Limiters". They do what they do not by reducing friction, but by transforming hard fouling into soft grease. How about calling them "Fouling Sanctifiers" for turning bad fouling into something good? From now on, I'm going to try to avoid using the term "lube" altogether and call it what it is, grease.Shooting grease
What I call 'shooting grease' can be as
simple as an eatable fat all by itself. Products
that are proved to work include tallow, Bore Butter, Crisco, Spit
Ball and lard, but I recommend that those products be used by
themselves only in cool to cold weather. All experts agree
that you shouldn't coat your bullets,
your revolver’s bore or the cylinder chambers with petroleum
based oil
or grease or alox.
Eatable fats dissolve and soften fouling whereas petroleum
derived
oils are reported to thicken into a kind of tar. Lately I've
read where it's OK to use water pump grease, but water pump grease
contains lithium and lithium is toxic. Thanks, but I'll leave
water pump grease to
others to try as I'm sticking to the traditional non toxic stuff.Some time ago I made up a custom blend of what I guess is about 85% Crisco and 15% beeswax (by volume) for use during warmer days (above 60F or 16C) and the stuff works way better than anything I've ever used. An added bonus is that I was able to use more grease without contaminating the powder below. If it is warm out, you are cautioned and urged to make up a "stiff" shooting grease appropriate to the outside temperature. To make this grease, carefully melt Crisco or your favorite shooting grease and then blend in beeswax. After blended, pour the hot liquid mixture in a metal or a heat resistant shallow glass jar and let it cool over night. Depending your local weather, you may want to use even more beeswax to increase the melting point. You can easily remelt and re-blend the mixture until you get it just right, but be careful and use just enough heat to barely melt the beeswax -- a grease fire on top of a stove is not a good thing. Heating in a hot water bath works great and is very safe. Back in my youth I had about five different waxes for my cross country skis for every kind of skiing condition. It might not be a bad idea to have two, or three jars of shooting grease made up for different outside temperatures, but my one jar seems to cover all my local weather conditions. By the way, this isn't a precision blend and it is up to you to find the blend that works best for your unique situation. In my opinion, there is no need to make up complicated or exotic mixtures with exact formulas. I think that if you just keep it simple, you will be very pleased with the results. For me, there is a joy in simplicity, so I'd like to suggest that you K.I.S.S. (keep it simply sonny). By the way, a couple of my readers sent me exotic formulas that include mineral oil and paraffin together with olive oil and all sorts of things that are all blended in exactly measured proportions. If it works and you like making up and using the stuff, who am I to argue with success? My only question is, why go to such trouble when a simple mixture of fat and beeswax works so well? On the other hand, it is only by experimenting that progress can be made and so I urge you to try other ways of doing things until you discover just what works best for you. Let's face it, we all have in us a bit of the "Mad Scientist" and many of us take joy in making up our own "special blend" that somehow we "just know" will give us an edge over other shooters. It is my opinion that if everybody is using some kind of a shooting grease that prevents fouling from building up in their barrel, then top scores aren't due to some "special formula" nearly so much as they are to the skill of the shooter. How well does a shooting grease mixture like this work? After I first blended up this fat + wax shooting grease, I was just amazed at how clean my bore stayed and I was even more amazed that the grease got into the bottom of the chambers so that there was no hard fouling build up down there either. When the charges go off, the stuff must atomize and get everywhere. My already easy cleanup was even easier and took fewer dry patches as there was hardly any residue in either the barrel or in any of the chambers. I highly recommend experimenting with mixtures like this. It's cheap, easy to make up and it works fantastic in revolvers. Steps I use to load my black
powder revolver
First, to cap or not to cap
It
is a long tradition that the cones be capped only as a final step.
It has always been assumed that this is the most safe way to
load
a black powder revolver because the caps are exposed and may be set off
if the pistol is dropped while loading other chambers. There
is
also a fear that rammer pressure somehow might get transferred to the
caps and set them off as the bullet is put in. I admit that I
have never considered if it was wise or not to cap first, but now I'm
wondering.
The importance of
loading powder cleanlyIf the revolver is loaded on a bench will little room to fall and it is held properly, the chances of dropping it while loading is no more than dropping while withdrawing it from a holster or picking it up -- in my opinion. With regard to the second point, there is no way for the pressure from the rammer to exert pressure on the caps. As everybody knows, caps don't go off by themselves, but take a sharp blow from the head of the hammer falling from full cock position to set them off. I'm not saying that you should cap first and ignore the old tradition, but if you have to use unusual force to get your caps to seat, you might think about capping first and then proceeding with the loading sequence. You might consider this, if your cap went off while putting it on a loaded chamber, that could be serious, but if it went off on an empty chamber, no problem. Another thing to consider, would you feel safe and good about using your rammer over a capped load? Next time I'm at the range I plan to load by putting on the caps first. If you don't hear back, assume I had a terrible accident, otherwise I'll let you know what I think. A reminder from chapter two
Regardless of which of the following
methods you use, first
wipe off the top of your chamfered
cylinder
with a cloth then carefully load each
chamber
with FFFG powder using the "clean powder management" suggestions I
wrote about in chapter 2. Begin by filling each and every
chamber
with the proper volume of powder. Brush away any grains of
powder
that
might be
loose on the top of the cylinder or on the sides of the chambers after
all chambers are CLEANLY
loaded with powder.
I have already included the following in the second article of my black
powder revolver series, but this is so important, I am repeating it
here too. The volume of powder to choose
when loading
You must never load the chambers with
too much
powder or use too much filler. Why? Because the
tops of your bullets won't be flush with the cylinder.
If a bullet is sticking up, the cylinder won't rotate and
your
pistol will seriously jam. Believe me, you do not want to use
so much powder that the bullets are too
close to the top of the cylinder or you may be in the embarrassing
position of having to use a sharp knife to peel away at the tops of
your bullets until your cylinder fits. Not a good thing to be
doing at the range with everybody watching.Problems with too much or too little I don't know how much powder to suggest for the .36 caliber "Navy" pistols, but the .44 caliber "Army" pistols must not be loaded with more than 30 grains (by volume) of real or substitute powder when using round balls and no more than 25 grains when using conical bullets. If your pistol has a brass frame, you might consider a 25 grain load as maximum. When using thick wads, you may have to use even less powder. For the "Navy" .36 caliber, you will use much less powder (20 grains maximum I think). You may want to work up from smaller charges (around 20 grains for the Army caliber and 15 for the Navy caliber) to see how deeply the bullets seat and to see if maybe you like the reduced blast and recoil better. By the way, everybody should know that it is impossible to load a chamber with so much black powder or Pyrodex that the pistol is in any danger of "exploding" or harming you in any way. This can't happen when you use black powder or a commercial substitute because small volumes of these powders just can't create dangerously high pressures and even Walker Colt chambers can't hold enough powder to be dangerous. Dangerous pressures sure can happen with fast burning, high pressure smokeless powders, but not with black powder. What about putting in full loads into a brass frame Colt type revolver? As long as you can seat the bullets below the level of the cylinder, you are safe, but full loads are reported to eventually cause the arbor to pull out of the brass frame as strains build up. The pistol will never explode nor will you ever be exposed to any danger no matter how much powder you stuff in there, but eventually the pistol will be ruined and for what, a little more smoke? Lately it has come to my attention that some shooters are filling their chambers up to the top with Triple Seven (777) and then compressing the load really hard. Please don't do this, it's dangerous. Unlike black powder or Pyrodex, Triple Seven will compress under excessive rammer force. If you compress Triple Seven this way, a chamber could develop dangerously high pressure. Oh yeah, you will get some really impressive muzzle velocities, but you are taking a bad risk and you will ruin a brass frame revolver real quick. So, what about underloading a chamber, is that possible? Under certain conditions, YES, underloading can be a problem because a total or partial ignition failure can happen with small charges. When a the charge fails to ignite properly, a very weak shot occurs and many times the slug is propelled into the barrel, but does not exit out the muzzle. This is a very bad deal. The next shot taken with an obstructed barrel will cause the fast moving slug to smash into the stalled slug and we all know that two material objects can't occupy the same space at the same time so room for those two slugs has to come from somewhere and that "somewhere" is a bulge or a split in the barrel. The good news is that even a badly split barrel is unlikely to hurt the shooter, but it will destroy the revolver and certainly make you feel real dumb. It is my sincere opinion that if you like shooting "squib" (low power) shots, you should load with real black powder only. The reason I say that small charges should only be done with real black powder, is because black powder ignites so easily so that even as little as 15 grains will fire and propel a .44 slug out the barrel. On the other hand, substitutes, especially Triple Seven, are much harder to ignite and the hot gases from the cap have a really hard time igniting just a short length of it. Again, it is my advice to use full or nearly full charges when using black powder substitutes and always, regardless of the powder you are using, don't shoot the next round, but check your barrel for obstructions if one of your shots feels weak or a chamber fails to discharge fully. This just added to my article: There is a product I have just learned about and I think it is worth trying. I just found out that Pyrodex comes in pellets that have the same volume as 30 grains of black powder and are made especially for .44 caliber revolvers. These pellets would make loading very fast, but more importantly, your pistol would load very cleanly with no possibility of spilling powder on the top of the cylinder. Because these pellets come pre-measured, you can't overload a chamber so the bullet sticks out. These pellets are kind of expensive, but you might want to give them a try anyway. Be sure to load the dark, black powder side toward the nipples otherwise you might get a misfire. If you do decide to try these out, you will still need to follow the instructions below with some kind of wad or spacer and grease behind the slug. The only thing the pellets do for you is make loading powder cleaner and faster. Should you use these pellets in a brass framed .44 revolver? They would be equivalent to a full charge of black powder and would likely over-stress the brass frame. Use of them in brass framed revolvers may not be a good idea, in my opinion. Three 'grease behind the bullet'
techniques to prevent fouling
If you wish, you can fully load each chamber one at a time, just don't cap any until all are loaded I find it more convenient to do a single operation on all chambers before going on to the next operation. The
improvements you will notice shooting with grease behind the bullets
When you load
by means of one of the methods I am about to describe, you will notice
three important things. First, you will be pleased at how much more accurately your pistol is shooting especially toward the end of your shooting session. Second, it will take much longer for your cylinder to start feeling sluggish and you will be able to fire more shots before it binds up altogether. People have written to me that they shot over 100 rounds without their cylinders feeling sluggish and they believe they could have shot even more. I can't speak to that personally because I always have other firearms and loads I'm experimenting with, sighting in or practicing with while I'm at the range and I never shoot more than 30 rounds at one time. Finally, cleaning your revolver’s barrel will take much less time and will require little or no solvents and NO soap and water. A lot more will be said about that later in the next article. Here are the loading techniques you might want to try: Grease Behind the Slug Method No. 1 After putting in the right amount of powder in each of the chambers, take commercially manufactured felt revolver wads and insert one in each chamber. Seat the wads on the powder with the rammer (see the note below). The manufacturer impregnates these wads with a "lubricant", but in my opinion, they do not contain nearly enough or the right kind of fouling modifier. Using wads is great for two reasons. First, it sweeps the chamber walls of any powder grains that might be there (helping to prevent chain firing) and it provides a moderate amount of space for excess 'behind the bullet' grease that might otherwise contaminate the powder. Just lately it has come to my attention that the inexpensive brass framed .44 Pietta revolvers have undersized rammers that don't fit the chamber diameter and so they can not seat the wad squarely on top of the powder. If you have one of these pistols, I suggest you make yourself a wooden dowel of the right diameter so that you can use it to seat the wads properly. Grease
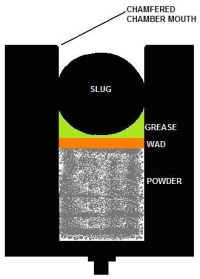
Behind the Slug Method
No. 2
A cross section of a revolver
chamber showing the recommended
loading technique using a commercial or home made wad. Notice that there is no grease on top of the slug. Notice too that the amount of grease is not excessive or squeezed past the wad and into the powder. Grease
Behind the Slug Method
No. 3 Be aware that sometimes
a wad of
smoldering meal lands in front of the shooter and if there is anything
down there that can catch fire, it will. I came within
seconds of burning down my
local shooting range's building when a smoldering wad of meal caught
the old rugs in front of me on fire (true story!). They don't
call these things "FIRE arms" for
nothing. Be sure the space in front of you is not covered by
a
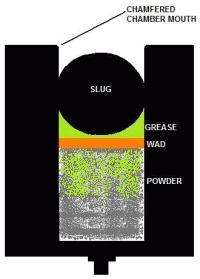
rug or dry grass that can catch fire.  A cross section of a revolver chamber showing the recommended loading technique using a filler and when loading for light loads without a wad. Grease may be forced into the top portion of the filler material, but trapped in there, it can not affect the powder below it. Because of possible ignition failures, I strongly recommend using only real black powder in light "squib" loads. When you have all the chambers
loaded, regardless
of what
method you used, here's what you do next: Please keep in mind that if you use too much, there is a danger you will contaminate your powder with grease (not a good thing) so be careful and use common sense when applying shooting grease.
Smear a small AND I MEAN A SMALL amount
of beeswax
blended with
Crisco, Bore Butter, lard, tallow or a similar kind of
grease on the tip your
index finger and
then wipe it across the top of a chamber so as to leave a small (and I
mean SMALL) amount
of grease clinging to the side of the chamber. Use shooting
grease not blended with beeswax only in cool/cold weather and only if
you are sure it won't get runny inside the chambers. Do this
until all
six chambers are "lubed" in this manner. Note: If you use
too much grease, it will get past the spacer and contaminate the
powder
when the ball is rammed down and you might get a misfire or the
resulting shot might be weak.
I write more about this later, but for now, watch out how
much
grease you use and how runny it is.
 being squeezed down into and contaminating the powder. This will result in a weak shot and should be avoided.
Final
loading steps
The next step is to place a ball (or
slug) over a chamfered chamber, ram it home and repeat until all
chambers are
loaded. Use only enough rammer force to gently seat the
bullet
and try to avoid jamming it down hard. It is important to
seat
the bullets, but excess force does no good at all. If you
are
finding that you are using a lot of brute force when you put the
bullets in the chambers, there is probably something wrong and you
should think about ways of reducing that force. Are you using
too
much powder and squeezing down to clear the top of the cylinder?
That's dumb, don't do it. Are the openings to your
chambers
chamfered? It's easy to do. Are you using oversized
slugs?
Some people think oversized slugs are more accurate because
more
of the bullet contacts the rifling, but, in my opinion, the difference
is trivial. It may be trivial, but the increase in rammer
force
can be significant. Speaking of rammer
force, it has come to
my attention that one of the factors (besides overloading) that causes
Colt style brass framed revolvers to become loose over time is
accumulated strains put on the cylinder arbor that tend to pull the
arbor out of the brass frame. These strains are caused by
excessive rammer force pulling on the arbor. Excessive rammer
force is in turn caused by using oversized slugs, unchamfered
chamber mouths and squeezing too hard on slugs that are already rammed
in. If you
have a brass framed revolver, I suggest you be mindful of the rammer
force you are applying and do whatever you can to minimize it.
Remember, brass is only marginally strong enough as a frame
material under ordinary stress situations, but if over-stressed, it
will yield and over time the revolver will become ruined.
A special word on capping when
this is the last step in the loading process
It
has been my experience that capping is the most
dangerous time in the whole reloading sequence. My best
friend
severely injured his hand and people standing nearby could have been
hit when he used a wooden stick to jam on undersized caps and one of
the chambers went off. Under no circumstance use
undersized caps and under no circumstance hold the pistol by its front
end while capping. Pietta suggests you use No. 10 caps, but
my
experience is that they are too tight and that even experienced people
(people who should know better) will get frustrated and use
extraordinary means to force them
on. One of the absolutely worst things you can do is to use a
stick or (may the gods forbid!!) a metal rod to jam on an undersized
cap with a loaded chamber. That is a
disaster waiting to happen and sooner or later a chamber will go off,
so please, don't use extraordinary force to get caps on your
revolver's nipples and, for the love of Pete, don't use any sticks or
rods either - fingers and thumbs only. Use No. 10 caps only
after
you are absolutely
sure your revolver's nipples are the right size to accept them.
In my opinion, it is best to use No. 11 caps and squeeze the skirt a little if they are a bit oversized. Don't worry about a lost or loose fitting cap causing a chain fire because experiment after experiment after experiment has convinced me that this is just another myth and old wives tale. Lost or loose fitting caps DO NOT cause chain fires and this is something you can experiment for yourself if you doubt it.  A possible conflict with club or
range rules if you don't 'Plaster On The Crisco'
Elsewhere I have mentioned that I believe that putting
grease on top of a loaded cylinder does no good, but can lead to an
increased risk of chain fires.
However,
I realize that old habits and old rules die hard. I'd like to
say, "DO NOT,
repeat, DO NOT put "lube" (grease) on top of the loaded chambers
after the
ball has been seated", but this isn't always possible
The problem is, we all have to play by the rules and if your range or club is run by some kind of a dictator who absolutely insists that you put grease over your loaded cylinder, don't argue, do it just to keep peace. Putting grease up there won't help anything, but it doesn't hurt much either and it just isn't worth making a fuss over. If you run into a conflict like this, please don't use my articles as "proof" that the club or the range "must" change their policies. If these alternative methods are any good, people will eventually notice. With the revolver capped
& loaded & with grease
As you begin and progress through your
shooting
session, there are things you should be looking for in addition to how
accurately you are shooting. As you shoot, you should
discover
for yourself how much shooting grease to use when loading.
I'll
have more to say about that shortly.behind the slugs, you are ready to shoot but your experimenting and learning has just started Misfires can be serious and you should know what to do should one occur. I will certainly have more to say about this. If you are shooting very light (squib) loads or blanks (as at a reenactment), there are things to keep in mind here too, but I'll have more to say about that shortly. You don't need me to tell you that reloading a black powder revolver effectively is a skill that you don't learn watching a video. You must practice both at home and at the range. Guess what? Yes, I'll have more to say about this too. In all cases, spend your time at the range to learn and teach yourself things so that shooting the black powder revolver becomes easy, convenient, safe and accurate. When you get to that point, the only thing the cartridge shooters will have on you is they go through their expensive ammo quicker than you do your cheaper ammo. Finding the optimum amount of
grease to use behind the bullets
Now, if
you don't use quite enough grease on subsequent loadings,
fouling will slowly build
up, you will
have to experiment a bit to find just the right amount of grease to
use and more will be said shortly. By no means use the same
amount of grease between the wad
and the bullet as people use when they plaster grease over a loaded
cylinder. It is probably best to start out with too little
grease
than with too much.(while at the range) One of the best ways to find out how much grease to use is to take your cleaning rod with you to the range. After loading with just a small amount of grease behind the slugs, take your first six shots, then put a dry patch on your jag and run it down the bore. If it glides smoothly down, you are probably using the proper amount of grease behind the slug. If it feels dry and rough, put some grease or eatable oil (jojoba, olive, Etc.) on a patch and let it dissolve the hard fouling. When the barrel is clear of fouling, reload but this time use slightly (very slightly) more grease. Shoot another six or more shots and then put a dry patch down the barrel again. Keep doing this until you determine how much grease to use. By the way, you can use a lot more grease when shooting round balls than with flat based conical bullets for the same volume of powder. If you are shooting conical bullets, you may have to reduce the powder volume to give room for the grease. When you ram in the slugs, try not to use so much force that the grease is squeezed past the wad and into the powder. Another
test to see if you used enough grease
When you get home and you go to
clean the barrel of your revolver, start by using a dry
patch. Simply
put a dry patch on your jag and run it down the bore. If
it slides
down easily and comes out covered with a coating of black, greasy, soft
goo, Congratulations: you are using the proper amount of "fouling
modifier" (grease).
If the patch will not easily go down the bore and/or the bore feels
rough
as you ram the patch down, you probably have already noticed that your
shooting wasn't’t very good and you need to use more "fouling
modifier" (grease) next
time. Oh yeah, be sure to bring your cleaning rod with you
next time you go out shooting.(if you didn't take your cleaning rod with you to the range) Ignition failures due to too much
grease or small charges
of hard to light powder (like 777) A very important safety
consideration
Lately it has
come to my attention that some people are having problems with ignition
failures. I know I will be largely repeating
myself with what I'm about to write, but this is so important that it
bears repeating in more detail, so please bear with me.
When a cap goes off, but fails to ignite the main charge properly or at all, it can be due to heavy contamination with grease or grease that is too runny or it may be due to using too small a charge of a hard to light powder like Triple Seven. When one of these things happens, sometimes the ball is left sticking half way out of its chamber (which is bad enough) and the cylinder won't rotate (the revolver is "jammed"). If the ball sticks out of the cylinder, you will have to push it back in with your cleaning rod (Remington style) or take the barrel off (if you have a Colt style). Remove the cylinder, unscrew the nipple and with a nail or thin rod of some kind, push the whole mess, powder, grease, wad and bullet, out the front of the chamber. 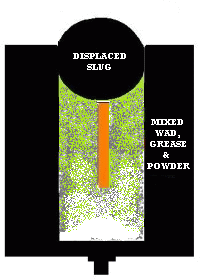
A cross section of a chamber after a cap fails to ignite the main charge. Wad displaced, grease and powder mixed together and the slug part or all the way out of the chamber. Many times the slug clears the cylinder, but gets stuck in the barrel. This can lead to very serious consequences because the cylinder will still rotate to the next chamber and the shooter might be tempted to take another shot. This is a real bad deal and you should NOT take that next shot. If a cap goes off without properly setting off the main charge, ABSOLUTELY DO NOT TRY TO FIRE THE NEXT CHAMBER UNTIL THE BARREL IS CHECKED FOR AN OBSTRUCTION. If an obstruction is there, a follow on shot will create a dangerous overpressure in the barrel and it will balloon or crack open as mentioned earlier. The obstruction may be removed simply by removing the cylinder and use the cleaning rod to push the obstruction out of the back of the barrel. Once the slug has been removed from the chamber or the barrel, wipe out all the mess in the chamber.  An actual Pietta .44 "Confederate 'Navy'" barrel that had an obstruction. It's unlikely that anybody was hurt, but the pistol was destroyed. If the problem is caused by using too much grease, reduce the amount of grease to just enough to keep fouling from building up and use an unblended grease only in cold weather. For warmer weather, you should use a stiffer grease that contains beeswax and scoop it out of a jar instead of squeezing it out of a tube. From a safety perspective, I can't emphasize enough how important it is that you do not contaminate your powder with grease when loading, but really, there is no reason this should be a problem if you use common sense and use only the minimum amount of shooting grease and a grease that is stiff enough for outside temperature conditions. In my opinion, it is better to use a grease that is a bit too stiff than one that is just a little too runny. If the problem is due to really small loads of Triple Seven, you might try slightly larger loads and, of course, never so much runny grease that it gets down into the powder. It is always advisable to bring your revolver tools with you when you go to the range, especially if you are experimenting with new loads and new techniques. Once you have settled into a system that you know is reliable, you may not need all that stuff, but when you need something, it's really good to have it in your "possibles bag" rather than at home. A special word for squib and
blank loads
For squib (low power) loads, it is my opinion that
you
really don't need to use a wad, but a wad does have the advantage of
"sweeping" the chamber walls clean of any powder grains that might
cause a chainfire. If using a wad, put it in first, ram it
down
and
then fill
the chamber with corn meal or Cream of Wheat filler, but leave enough
space for the slug. Honestly, I see no reason to use a wad if
using a thick layer of filler, but that is your decision.By the way, if you want to shoot "blanks" put in a normal charge of powder then fill the chambers up all the way with filler. Compress the filler with the rammer and you are ready to go. Your blank will be about as loud and the smoke and flame will be about the same as if you were shooting live bullets. You will even feel a recoil. I do not recommend using a wad when shooting blanks because it can come out and really sting somebody (or a horse) even at a great distance. Wads were not allowed at any of the reenactments I attended. Never use grease with blanks as it can cause the filler to stick together and act as a bullet. Without grease, expect that your pistol (or rifle) will develop thick fouling and jam after a dozen or so shots. A suggestion for beginners
Many people might think
this is silly, but it might be a good idea for beginners to lay out all
the loading stuff before them as if they were at the range.
With
everything assembled, go through all the motions of loading
(without actually loading) step by step several times before loading
for real out at the range. While loading the black powder
revolver isn't all that difficult, you do have to follow a precise
sequence and it is best to get the routine down before you get into a
stressful situation.Back in the day when I "wasn't exactly a rocket scientist", we would practice launching rockets over and over again in what we called a "dress rehearsal" and a "simflight" (simulated flight) that entailed everything except loading the liquid oxygen and actually lighting off the engines. We'd do this as many times as necessary until we were sure that everything was working perfectly and everybody knew his job when the real launch came. At the range there is usually a lot of shooting going on right next to you and people can feel way too rushed and excited while actually on the firing line. Take your time, practice and remember that practice is the key to learning. Don't be so proud that you think you are an expert just watching a video or skimming over some instructions. Even the world's greatest concert maestro spends hours and hours in practice to perform that musical passage that takes only a few minutes to play. Finally, at the old Rocket Ranch we used check lists for even the most simple tasks. Our check lists called out all the materials we would need and the steps necessary to accomplish a task. A lot of rockets blew up and a lot of planes crashed and a lot of other disasters happened before people realized how important a simple check list is. I suggest you make up a checklist of all the equipment and supplies you will need and a simplified procedure you should write up yourself to help guide you in loading. By the way, I see that hospitals are finally starting to use them too. Page Summery
In summery, for best precision and to
keep on
shooting without having to take frequent cleaning breaks and without
the cylinder binding up after just a few shots, grease behind the
slug is the only thing that I have found that works.
Not
only does it work, but it works extremely well and it puts the black
powder revolver in the same class with smokeless cartridge
revolvers when it comes to all day shooting and precision shooting.
I have presented three methods to accomplish this, but
there is a potential problem with using grease behind the slug and so
these methods should be performed with care and thought and you should
use a shooting grease that is appropriate to the temperatures at the
range. Of course, clean loading practice must always be
observed
or chainfiring will result.The next page contains my thoughts on cleaning the black powder revolver and why you should never use soap and water to clean your revolver. If you are hesitating getting into black powder shooting because of the undeserved reputation regarding the "terrible mess" involved in cleaning black powder revolvers, please read on. End of page 3
If you have entered this page from a search engine, I would like to invite you to start at page 1 Continue
on to Page
4 of my Revolver Articles
or Select another revolver article or See my other shooting articles that includes three articles on flintlock shooting If you are planning to leave without continuing, If you have any detailed comments, questions, complaints or suggestions, I would be grateful if you would please E-mail me directly Return to my Home Page |